What is Drip Edge?
Drip edge is the L-shaped metal flashing installed along the edges of a roof, under the shingles. It directs rainwater away from the fascia and into the gutter. In Maryland and Virginia, code requires drip edge on every new asphalt-shingle roof.
 Jim Dodson, HAAG Master Inspector · #992109047
Drip edge is the L-shaped metal flashing installed along the edges of a roof, tucked under the shingles and over the underlayment at the eaves, and on top of the underlayment at the rakes. Its job is to direct water off the roof, away from the fascia, and into the gutter. Maryland building code (and Virginia code) require drip edge on every new asphalt-shingle roof installation.
What it does
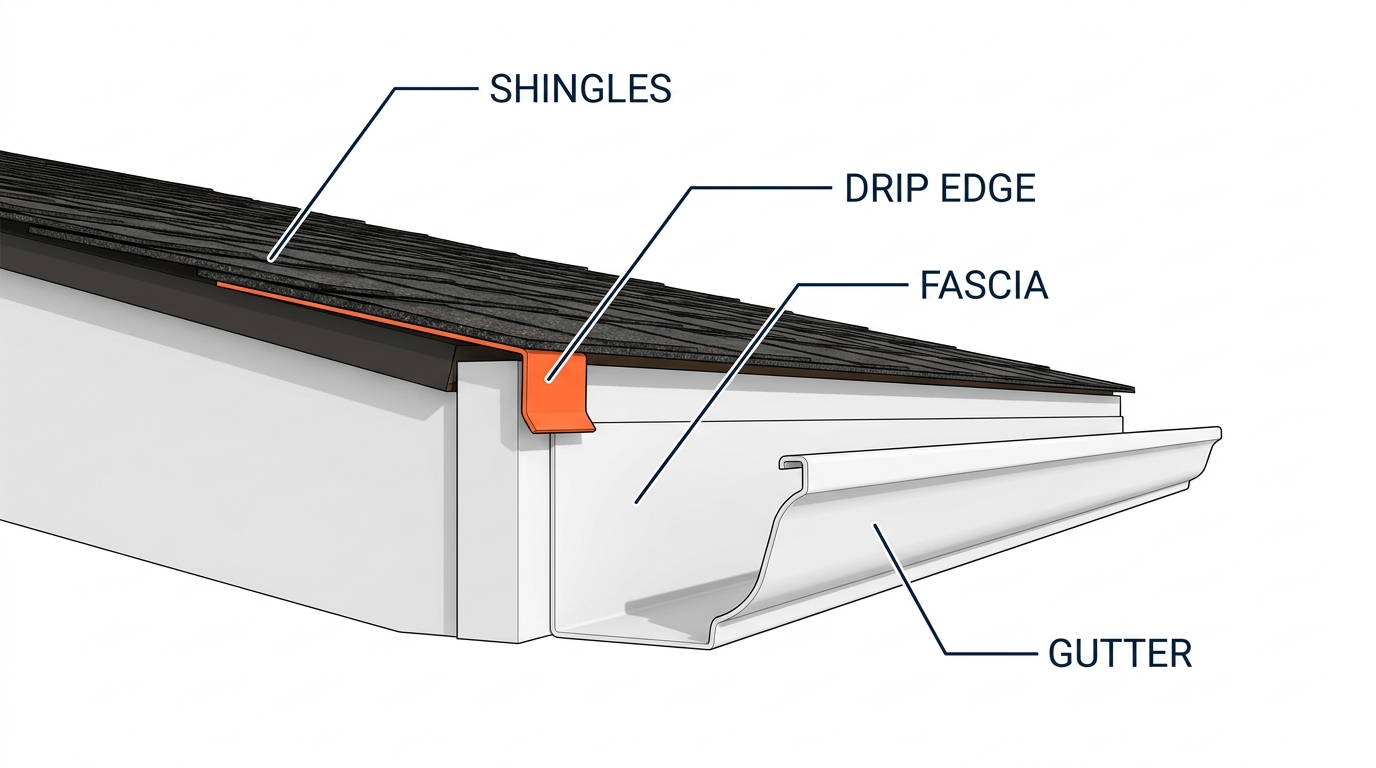
Drip edge has one job and does it well: it gets water off the roof deck and into the gutter without letting any of it touch the fascia, decking, or underlayment edges. At the eaves (the horizontal lower edge), drip edge sits on top of the deck and under the underlayment, so water that runs down the shingles is caught and redirected into the gutter. At the rakes (the sloped side edges of a gabled roof), drip edge sits on top of the underlayment, so wind-driven water is kept from getting underneath the shingles. Without drip edge, water wicks back into the fascia and decking, causing rot that may not show up for years.
Where it sits
Look at the very edge of your roof where the shingles end. The thin metal strip you can see between the shingles and the gutter, painted to match either the roof or the fascia, is the drip edge. It runs continuously along the entire perimeter of the roof, both along the eaves where the gutters are, and up the rakes on a gabled roof. Behind it sits the underlayment, the roof deck, and the fascia.
Common problems with drip edge
Missing entirely (pre-2010 roofs)
For decades, drip edge was optional in many jurisdictions. Plenty of older Maryland and Virginia roofs were installed without it. The result: rotted fascia, water-stained underlayment edges, and decking damage that only shows up at tear-off.
Wrong size or wrong profile
Drip edge comes in several profiles (Type C, Type D, Type F). A roofer using too-narrow drip edge or the wrong profile creates a gap where water can still wick onto the fascia. The roof looks fine; the damage is hidden.
Installed under the underlayment at the rakes
Drip edge belongs over the underlayment at the rakes (sloped sides). When it is tucked under, wind-driven rain rides up the underside and into the deck. Common installation mistake; subtle failure.
Damaged or pulled away by ice and storms
Drip edge can be bent, dented, or pulled loose by ice damming, hail strikes, or wind. Once compromised, it stops directing water properly and the fascia behind it starts taking abuse.
How to inspect drip edge on your own home
Drip edge inspection is mostly visual and best done from the ground with binoculars. Walk the perimeter of your home and look at the roof edge from a few angles. Check for:
- Is there drip edge at all? If you cannot see a continuous metal strip between the shingles and the gutter (or at the rakes), drip edge is missing or hidden behind the gutter improperly.
- Continuous coverage: drip edge should run unbroken along every roof edge, including over corners. Gaps mean exposure.
- Bent, dented, or pulled away sections: any visible damage from ice, storms, or ladder contact compromises the seal.
- Water staining on the fascia directly behind the drip edge: if the fascia is stained or rotted right behind where the drip edge should be doing its job, the drip edge has failed or is missing.
Keep exploring
Other glossary terms in the JDH Learning Center that touch the same area of your home or roof system.
Worried your roof is missing drip edge?
A HAAG-Certified JDH inspector will check the entire roof perimeter, confirm drip edge is present and installed correctly, and document any gaps, damage, or fascia rot caused by missing flashing. About 1 in 4 inspections result in no recommended work because we are not paid on commission.
From the JDH Team When you're ready to take the next step, work with our local MD & VA roofing team. JDH backs every job with our full Maryland and Virginia roofing services and flexible roofing financing options for every homeowner.