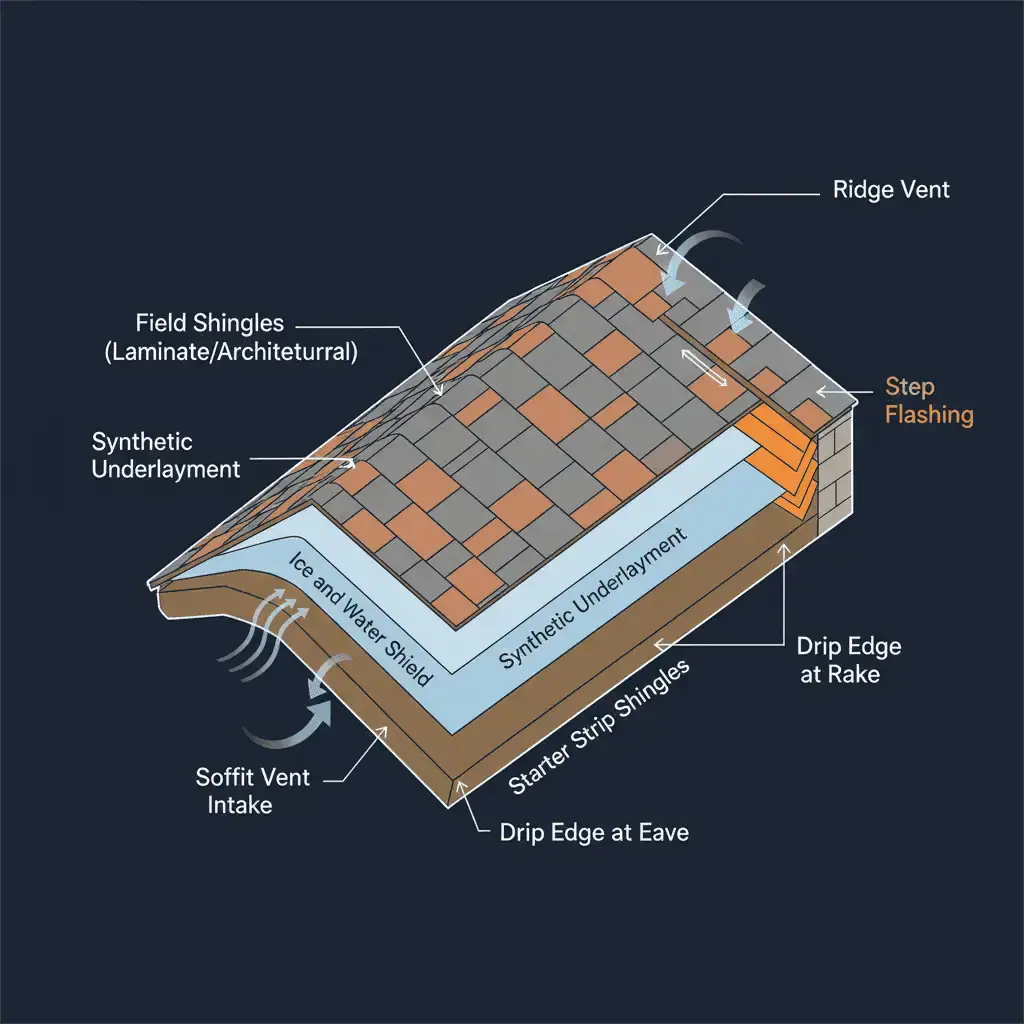
A Roof Is a System, Not a Shingle
Most homeowners think of their roof as shingles. That's understandable — shingles are what you see from the ground. But the shingles are just the outer layer of a system that includes underlayment, ice and water shield, drip edge, flashing, starter strip, ventilation, and ridge cap — all working together to keep water out and heat regulated.
When one component fails, it rarely stays isolated. A blocked soffit vent traps heat in the attic. That heat cooks the shingles from underneath, accelerating granule loss and breaking down the adhesive sealant strip. Once the sealant fails, wind catches the shingle edges. Once the wind lifts shingles, water gets in. What started as a ventilation problem becomes a full roof replacement.
This is why most roof failures aren't caused by one thing going wrong — they're caused by a chain reaction that started months or years earlier. Understanding that chain is the difference between a $400 repair and a $15,000 replacement.
How One Problem Becomes Five
The most common failure chain we see in Maryland and Virginia
Blocked Ventilation
Soffit intake covered by insulation or never installed
Heat Buildup
Attic temperatures cook the roof deck from inside out
Granule Loss + Sealant Failure
Shingles age prematurely, adhesive strip breaks down
Wind Damage + Leaks
Large sections unzip, water enters the structure
The 5 Reasons Roofs Fail Early
Based on thousands of forensic inspections across Maryland and Virginia — these are the root causes we find over and over again.
Improper Ventilation
The number one hidden killer. Blocked soffits and unbalanced airflow trap heat in the attic, cooking shingles from underneath and accelerating every other failure on this list.
Full breakdownInstallation Shortcuts
Three-tab shingles used as starter and cap. Felt paper instead of synthetic underlayment. Misaligned sealant strips that void the warranty. The roof looks fine from the ground — the problems are hidden underneath.
Full breakdownWrong or Inferior Products
Budget shingle brands with higher defect rates. Generic accessories substituted for manufacturer-matched components. Products installed outside their rated application — like standard shingles on a low-slope roof.
Full breakdownFlashing & Transition Failures
Step flashing installed over the vapor barrier instead of under it. Steep-to-low slope transitions not properly detailed. The most common source of leaks we find — and the hardest for homeowners to spot.
Full breakdownDeferred Maintenance & DIY Repairs
Flex Seal, caulk, and patch jobs that treat symptoms instead of root causes. The repair looks like it worked — until the water finds the next weakest point and causes damage that costs 10x the original fix.
Full breakdown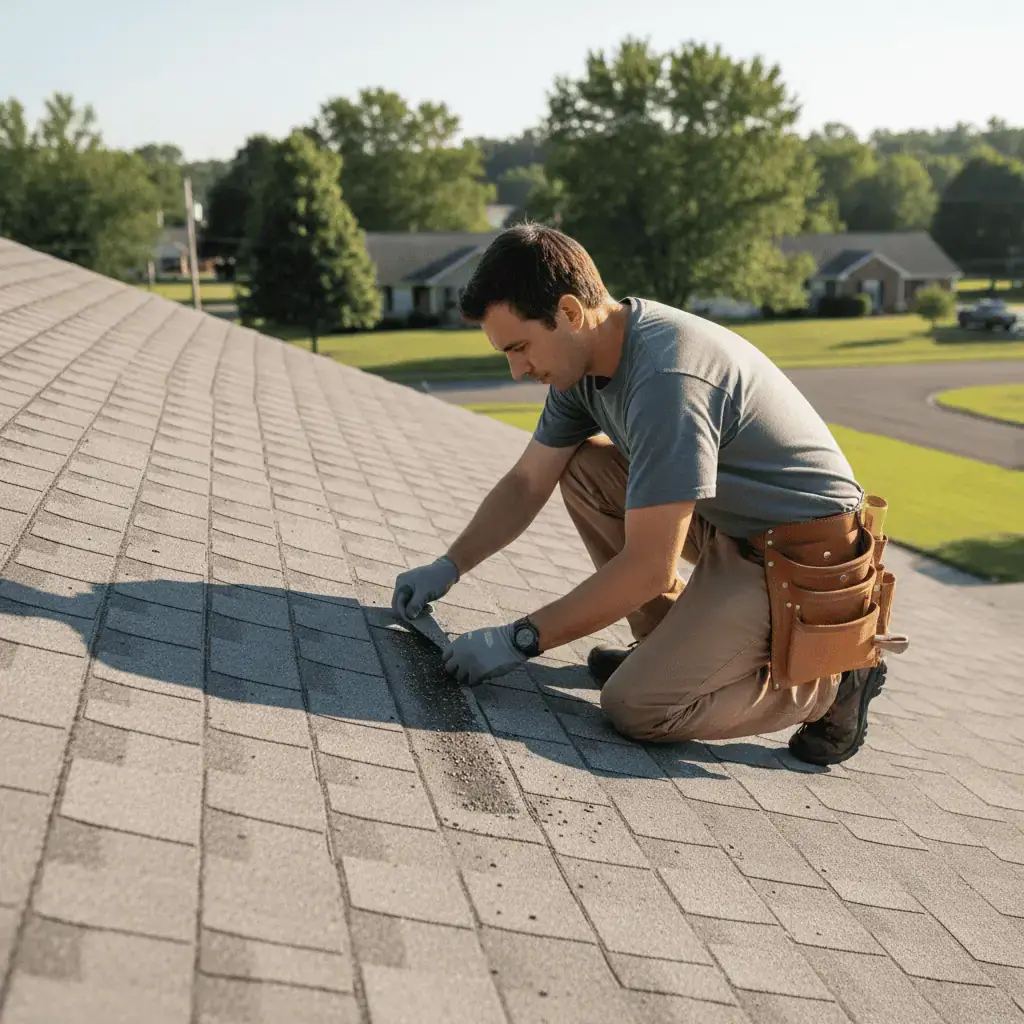
Ventilation: The Hidden Killer
If we could fix one thing on every roof we inspect, it would be ventilation. Improper ventilation is the root cause behind the majority of premature roof failures — and most homeowners have no idea it's happening until the damage is widespread.
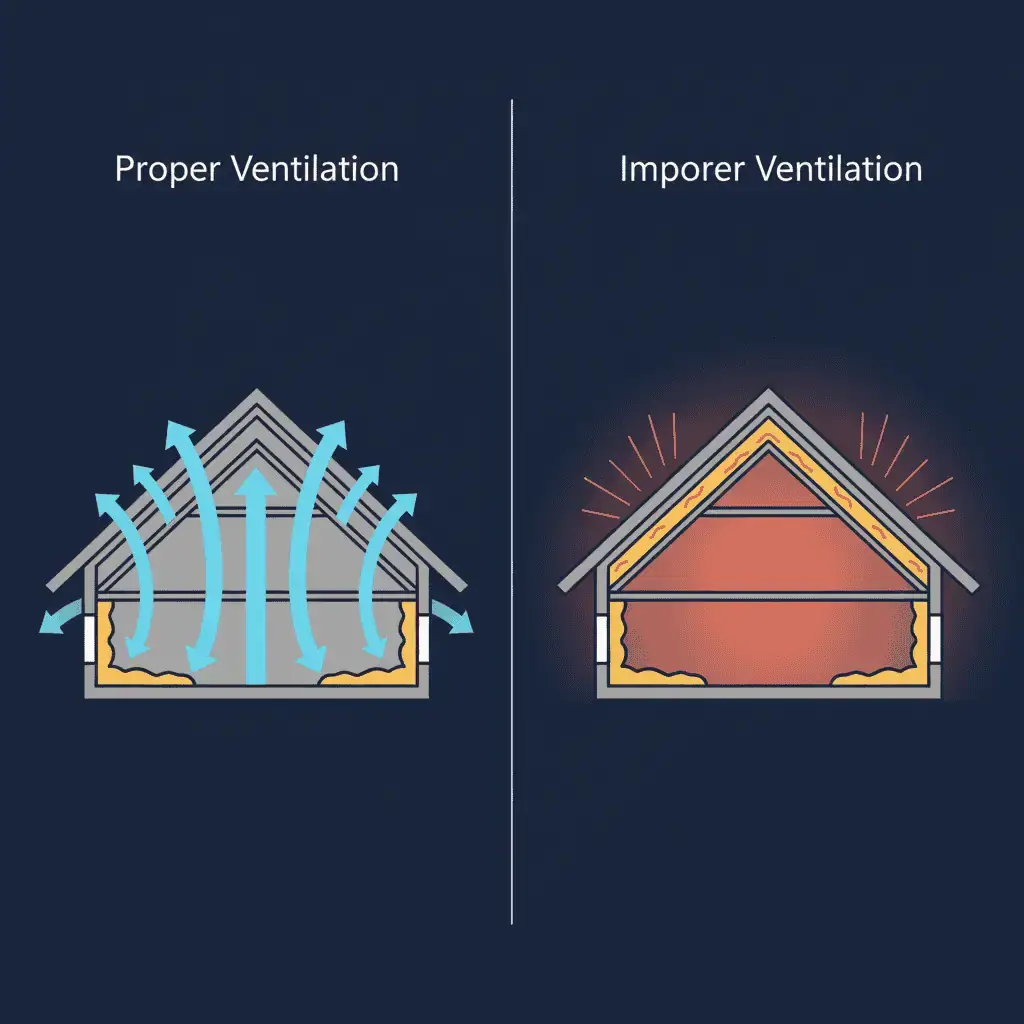
How It Cooks Your Roof From the Inside Out
Your attic is supposed to breathe. Cool air enters through soffit vents at the eave, travels up the underside of the roof deck, and exits through ridge vents or gable vents at the peak. This continuous airflow regulates temperature and removes moisture.
When that airflow is blocked — usually because insulation is covering the soffit intake or the soffit vents were never installed — heat builds up in the attic with nowhere to go. That trapped heat radiates directly into the roof deck and shingles from underneath, raising temperatures far beyond what the shingles were designed to handle.
The result is accelerated aging. The granules on your shingles — the textured surface that protects against UV — begin shedding prematurely. The adhesive sealant strip that bonds each shingle to the one below it softens and fails. Within a few years, you have a roof that looks 15 years old but was installed 5 years ago.
The Cookie-Cutter Roofer Problem
Most contractors approach ventilation with a one-size-fits-all formula: install a ridge vent and move on. But a ridge vent without adequate intake is useless — it has nothing to pull. And if they leave existing gable vents open after adding a ridge vent, the airflow short-circuits. Air takes the path of least resistance between the two exhaust points instead of flowing through the full roof deck.
Proper ventilation is about balance — not just adding more vents. It requires calculating intake and exhaust, verifying the soffits are actually open, and sometimes closing gable vents when a ridge vent is added. That level of attention is rare in a cookie-cutter replacement.
Soffits Buried in Insulation
Blown-in insulation piles against the eave and blocks airflow entirely. The attic has exhaust but zero intake — heat has nowhere to go.
Mixed Exhaust Types
Ridge vent plus open gable vents creates a short circuit. Air flows between the two exhaust points instead of pulling through the full deck.
Insufficient Soffit Depth
Some roof designs don't have enough soffit overhang for traditional vents. Without adding eave vents as an alternative, intake is severely restricted.
Balanced Airflow, Not Just More Vents
Not sure if your attic is properly ventilated? Most homeowners can't tell from the ground. We check ventilation on every inspection.
Schedule InspectionInstallation Shortcuts That Kill Roofs Early
The shingles look fine from the ground. The problems are underneath — in the components homeowners can't see and most roofers cut corners on. These shortcuts void manufacturer warranties and create failure points that show up 3–5 years later.
Starter Strip & Ridge Cap
Three-tab shingles used as starter and cap
The most common corner-cut in the industry. Roofers use cheap three-tab shingles flipped upside down as starter strip along the eave, and hand-cut three-tabs for the ridge cap. It saves them $200–$400 in materials per job.
Manufacturer-designed starter and ridge cap
Products like Owens Corning Starter Strip and Hip & Ridge shingles are engineered to align sealant strips with the corresponding field shingles. The bond line is continuous from eave to ridge. Wind resistance is rated, tested, and covered under the manufacturer warranty.
Underlayment
Felt paper (#15 or #30 felt)
Felt paper is literally construction paper. It's the cheapest underlayment option and has been used for decades — but it was designed for a different era of roofing, before laminate shingles and modern heat loads.
Synthetic underlayment
Modern synthetic underlayment (like OC ProArmor or Titanium UDL) is engineered to resist heat, UV, and moisture without breaking down. It doesn't fuse to the shingles. It stays intact as a functioning secondary barrier for the full life of the roof — and it's required for most manufacturer warranty programs.
Step Flashing at Wall Intersections
Flashing installed over the vapor barrier
The step flashing is placed under the siding but on top of the house wrap (Tyvek, etc.). From the outside, it looks correct — the flashing is behind the siding where it belongs.
Flashing tucked under the vapor barrier
The correct layering order is: shingle → step flashing → vapor barrier (house wrap) → siding. The flashing goes under the vapor barrier so that any water hitting the wall is directed onto the flashing and out over the shingle below — never reaching the sheathing. Seams are taped for additional protection.
Steep-to-Low Slope Transitions
Standard shingles run onto the low slope
Roofers carry the same laminate shingles from the steep section right onto the low-slope area because homeowners don't like the look of flat roof products and contractors don't want the hassle of switching materials.
Proper low-slope product and detailed transition
Low-slope areas require a product rated for the pitch — options include modified bitumen, TPO, or a manufacturer-rated low-slope shingle like OC Deck Seal. The steep-to-low transition gets full ice and water shield coverage with properly lapped flashing so the two roof planes work as one system, not two separate surfaces meeting at a weak point.
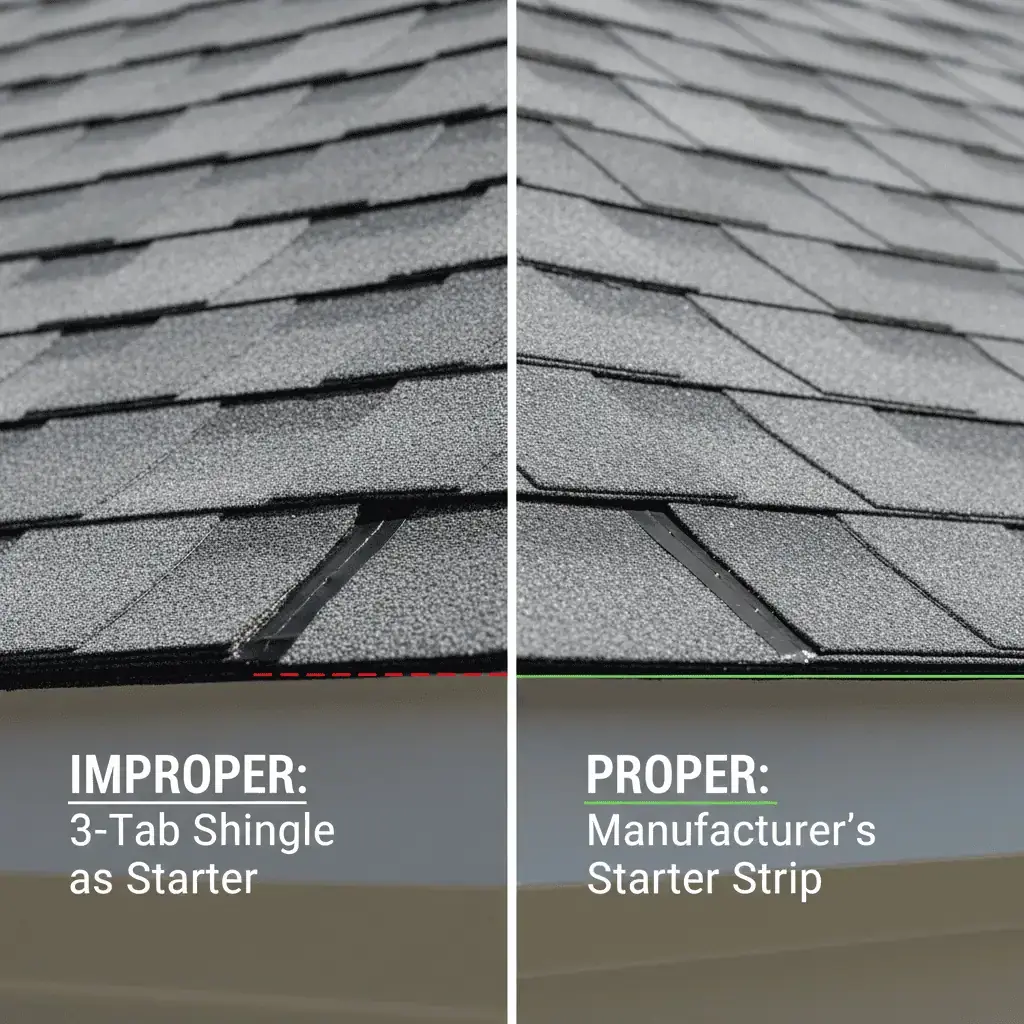
Starter Strip Comparison
Left: three-tab with misaligned sealant. Right: manufacturer starter with continuous bond line.
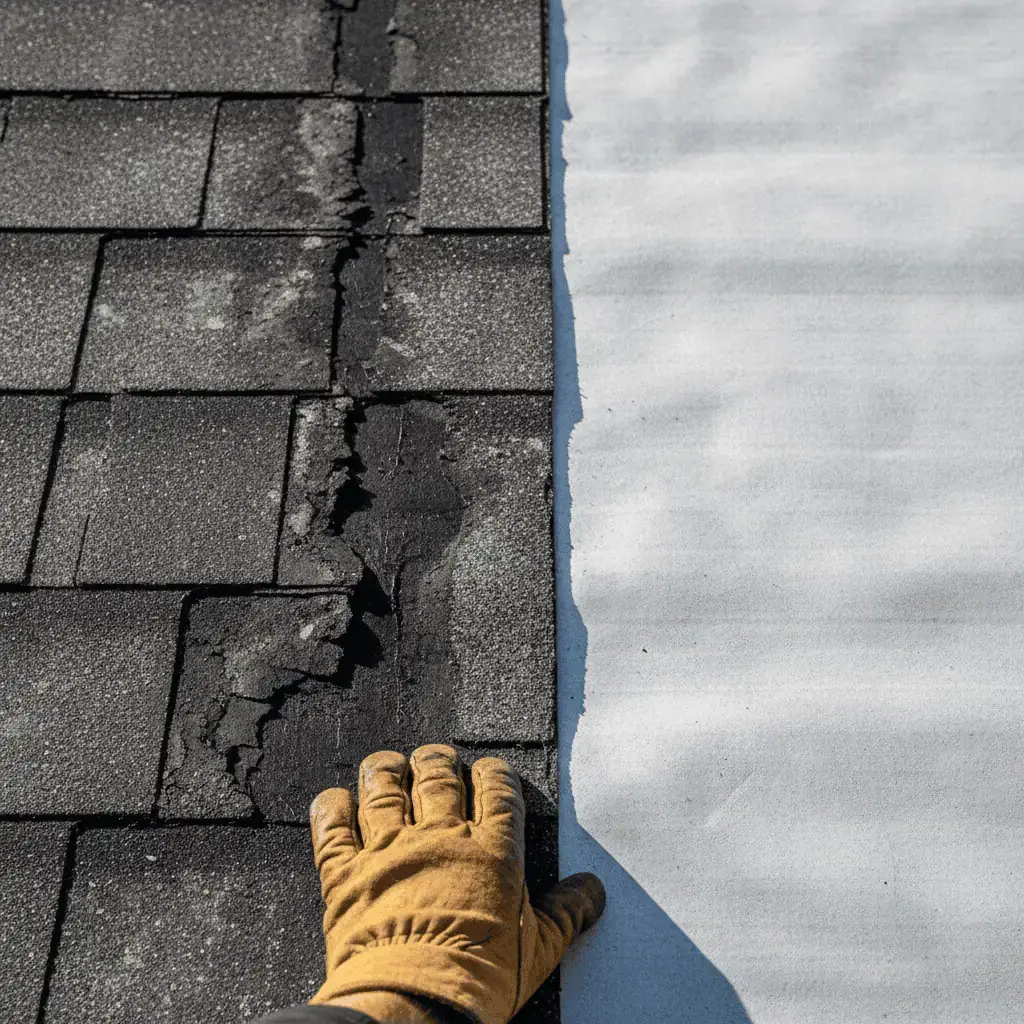
Underlayment Tear-Off
Left: felt paper fused to shingle, brittle and disintegrated. Right: synthetic still intact after same exposure.

Proper Step Flashing Layering
Flashing tucked under the vapor barrier (house wrap), not over it. Water is directed onto the shingle, never reaching the wall sheathing.
The Invisible Problem
Every shortcut on this list looks fine from the ground — and most will last 2–5 years before the consequences show up. That's why a forensic-level inspection matters. If you're questioning the quality of a recent roof install, or getting a second opinion before a replacement, ask your contractor to walk you through every component — not just the shingles. Use our contractor checklist to know what to look for.
The Warranty You Think You Have
Most homeowners believe their "30-year roof" means 30 years of full protection. It doesn't. Here's what the standard warranty actually covers — and what a real system warranty looks like.
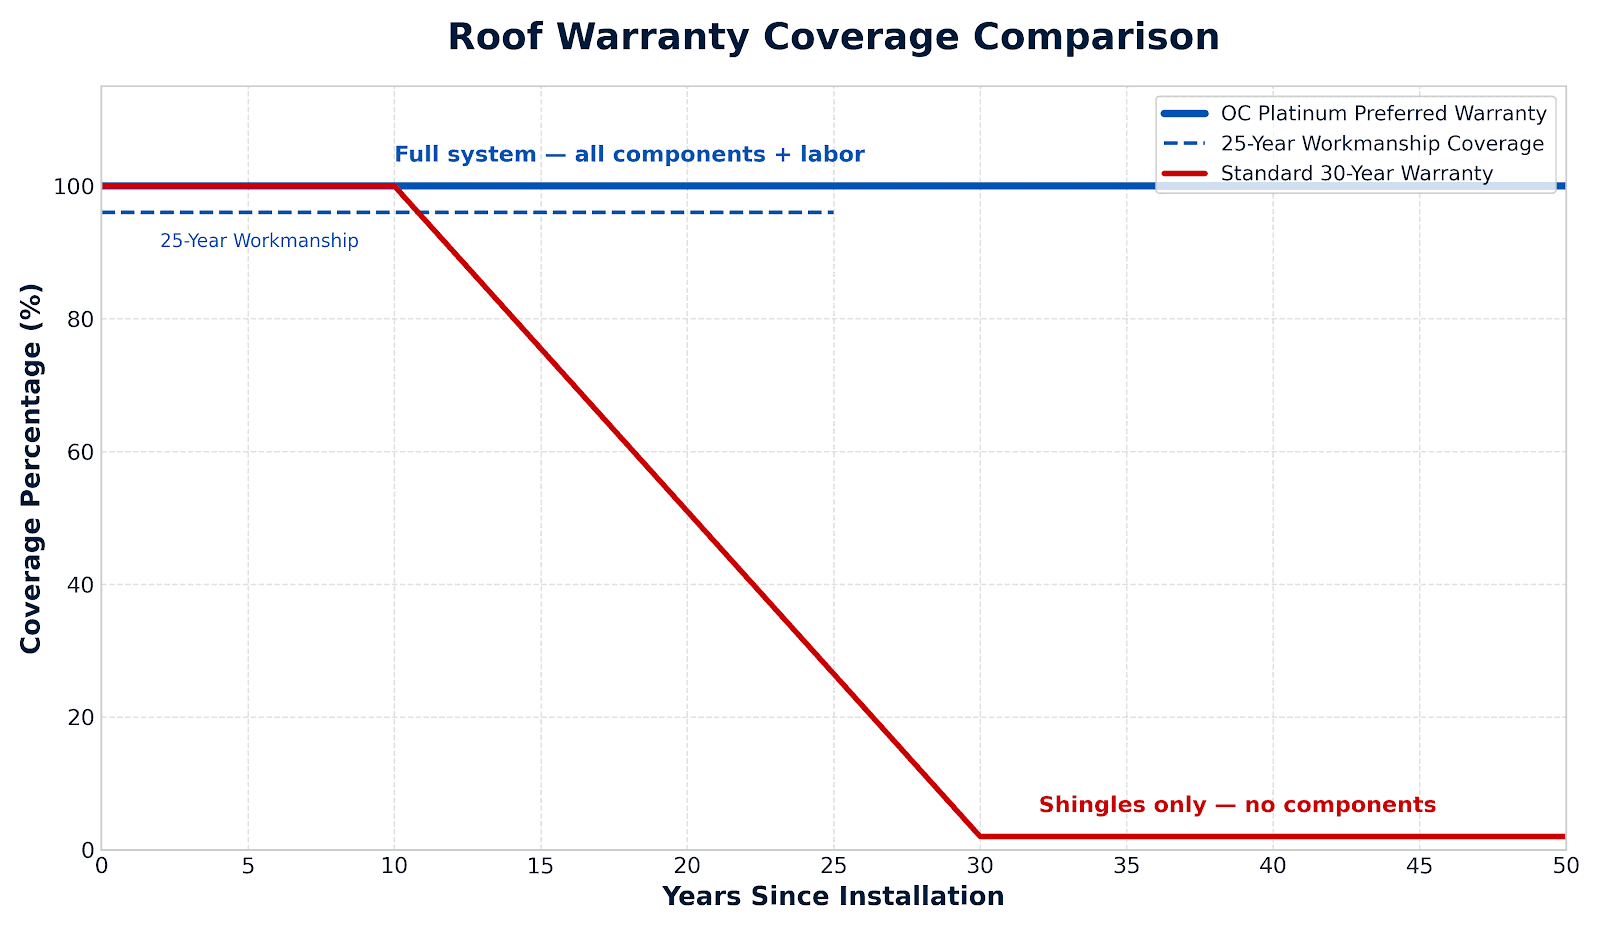
Standard "30-Year" Warranty
Shingles Only
Covers the shingle product — not underlayment, flashing, starter, ridge cap, ventilation, or any other component.
Depreciates After Year 10
Coverage begins declining after 10 years. By year 20, the warranty may only cover a fraction of replacement cost.
No Workmanship Coverage
If the contractor installed it wrong — wrong products, poor flashing, bad ventilation — the manufacturer isn't responsible.
No Labor Included
Even if a shingle defect is covered, you still pay for the labor to tear off and reinstall. That's the majority of the cost.
Owens Corning Platinum Preferred
Full System Coverage
Shingles, underlayment, ice and water shield, starter strip, ridge cap, and ventilation — the entire OC roof system is warranted.
50 Years — Non-Depreciating
Material coverage stays at full value for 50 years. No depreciation schedule. Year 1 and year 40 have the same coverage.
25 Years Workmanship
If the installation is defective — even if the products are fine — the warranty covers the cost of correcting it. This is manufacturer-backed, not just the contractor's word.
Requires All OC Products
To qualify for Platinum, every component must be Owens Corning. That's the point — the entire system is matched, tested, and guaranteed together.
Why This Matters When Your Roof Fails
Here's the scenario we see regularly: a homeowner has a roof that's 12 years old. The shingles are curling, the sealant has failed, and they're getting leaks. They call their contractor, who tells them to file a warranty claim.
Then they learn the truth. The warranty has been depreciating for two years. It only covers the shingles — not the underlayment that fused to the deck, not the flashing that was never sealed, not the ventilation that was never balanced. And it doesn't cover labor. The "30-year warranty" covers maybe 20% of their actual replacement cost.
The warranty program matters because it determines whether the manufacturer stands behind the entire roof — or just the shingles. The Owens Corning Platinum Preferred warranty requires all OC components specifically so that the full system is covered. If your contractor used generic accessories or mixed brands, you don't have system protection — you have a shingle coupon that loses value every year.
Not Sure What Warranty You Actually Have?
Call the manufacturer directly and ask them to look up your address. If your warranty isn't in their system, it doesn't exist. We can help you verify.
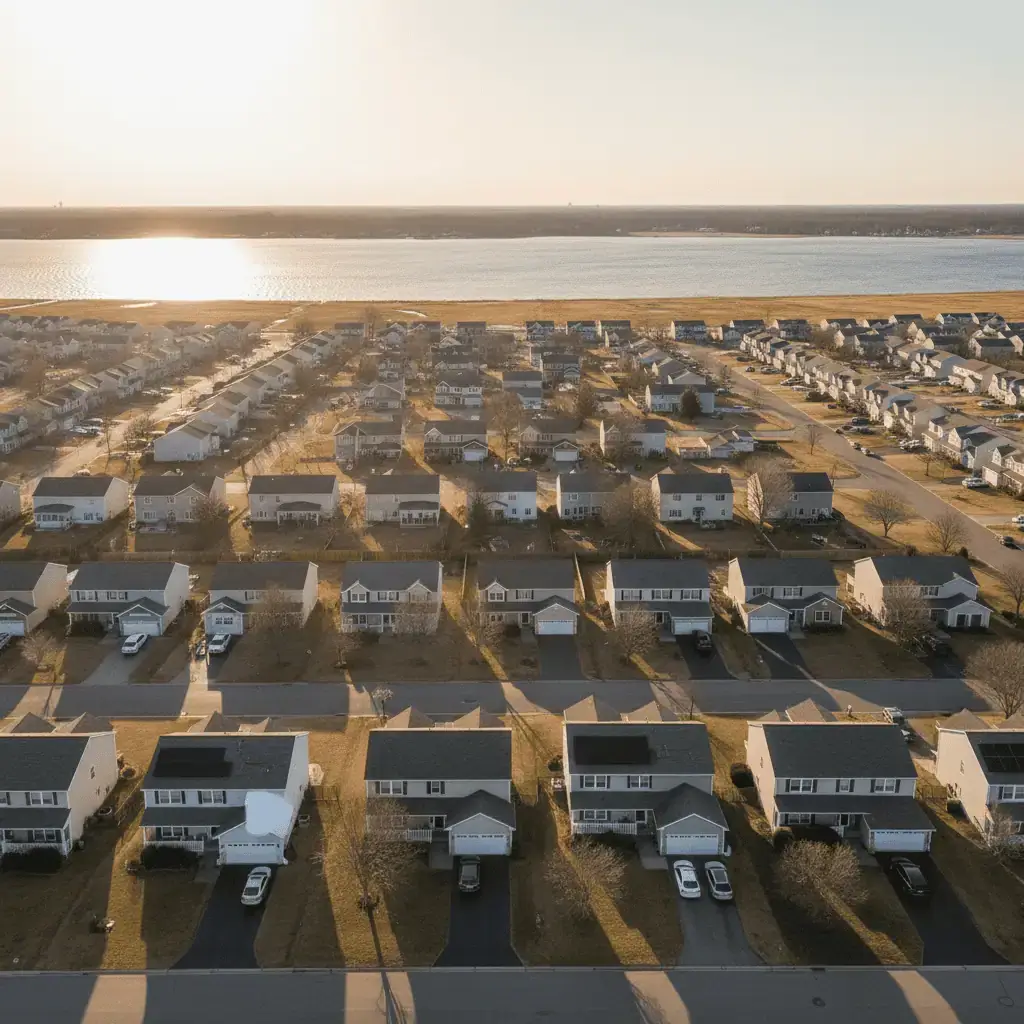
Wind, Weather & the Bay Effect
Southern Maryland and the Northern Virginia tidewater region aren't just "windy." The Chesapeake Bay and its river corridors create concentrated wind funnels that hit roofs differently than inland areas — and modern shingle technology means wind damage looks different than it used to.
How Modern Shingles Change the Damage Pattern
Older three-tab shingles failed in small sections. Wind would catch a tab, flip it, and you'd lose a handful of shingles. The damage was visible, localized, and relatively cheap to repair.
Modern laminate (architectural) shingles are engineered differently. They bond to each other through a continuous sealant strip, creating what is essentially one large sheet across the roof surface. Under normal conditions, this makes them significantly stronger than three-tabs — they resist wind better, shed water more effectively, and last longer.
But when that bonded system has a weak point — a section where the sealant failed due to heat, age, or a ventilation problem — the wind doesn't just lift one shingle. It unzips an entire section. We've seen storms pull back 20-foot-long strips of bonded laminate shingles in a single event. What would have been a $300 tab replacement on an older roof becomes a full slope re-shingle.
The Bay Corridor Effect
The Chesapeake Bay, Patuxent River, and Potomac create natural wind corridors. Water surfaces have zero wind resistance, so gusts accelerate over open water and hit shoreline neighborhoods at full speed. Properties within a few miles of these waterways experience sustained wind loads that are measurably higher than homes just 10 miles inland.
This is why two identical roofs installed the same year by the same crew can age completely differently depending on their proximity to water. The bay-side roof has been taking consistent wind punishment that the inland roof never experienced. That extra stress accelerates every other failure mode on this page — ventilation problems, installation shortcuts, and material failures all compound faster under wind load.
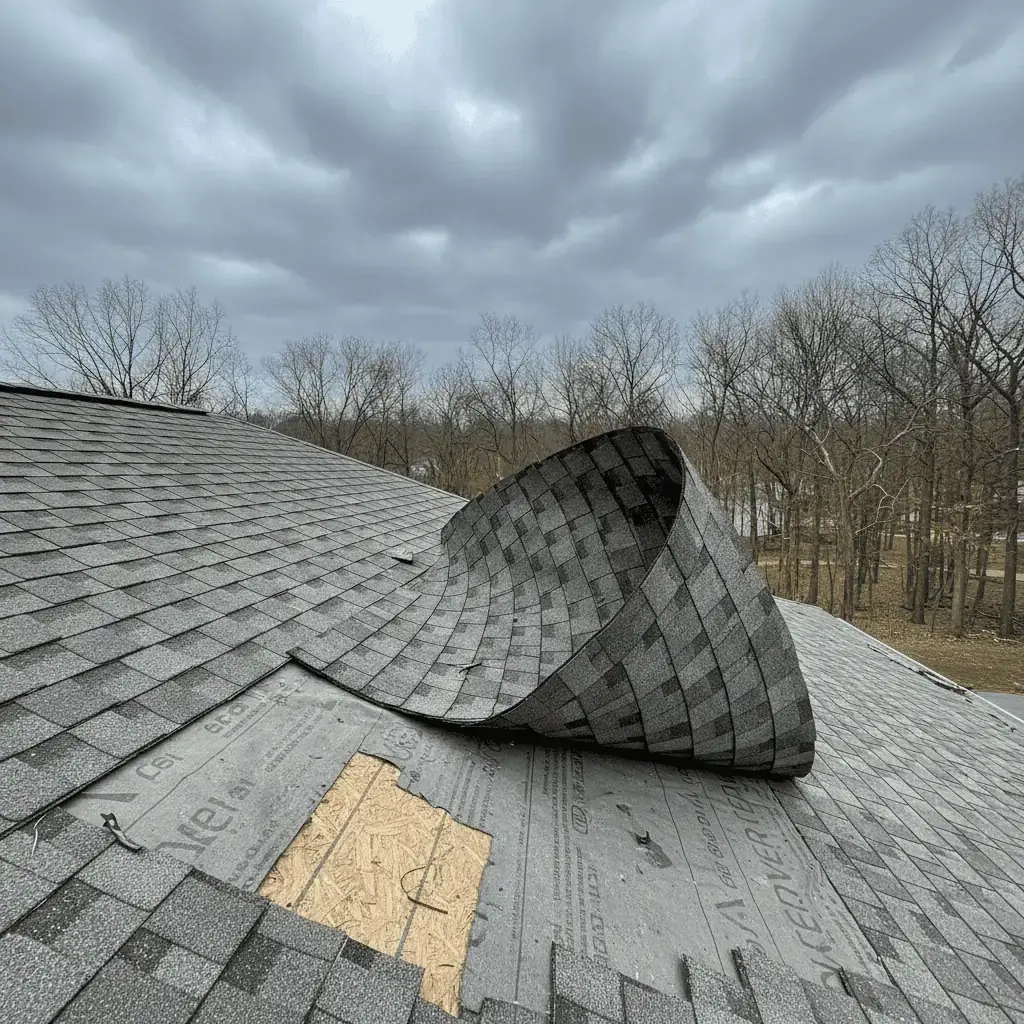
Catastrophic Unzipping — Laminate Shingles
One weak point in the sealant bond allowed wind to peel back an entire bonded section. This was a single storm event on a 7-year-old roof.
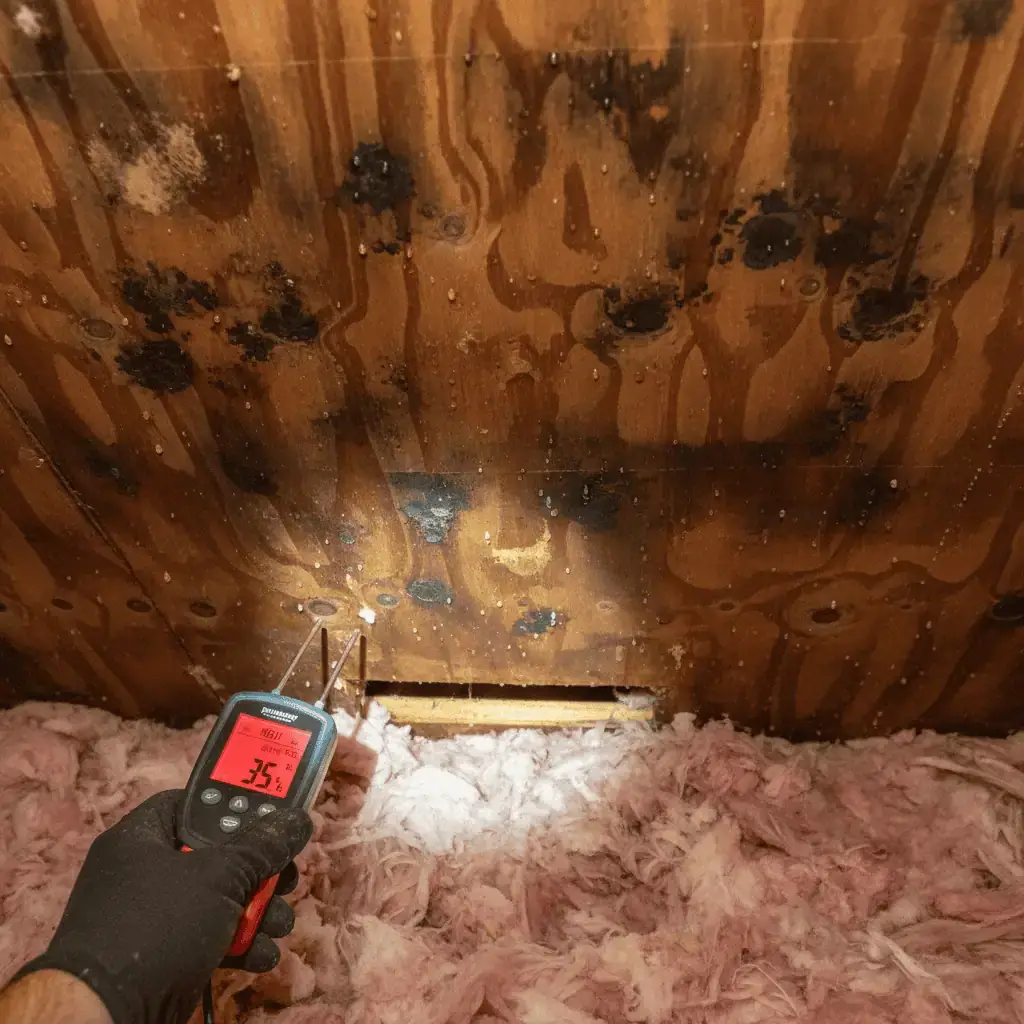
Progressive Hidden Damage
Wind can break sealant bonds without lifting the shingle visibly. The damage is invisible from the ground — but the next storm has a starting point to work from. Each event weakens the system further until catastrophic failure.
Eave Edges Are Most Vulnerable
Wind hits hardest at eaves, rakes, and ridgelines. If the starter strip sealant isn't properly bonded — or if three-tab was used instead of manufacturer starter — these edges are the first to fail.
Annual Inspections Are Critical Here
In bay and river corridor zones, annual inspections aren't optional — they're essential. Catching a broken sealant bond early means a minor repair. Missing it means waiting for the next storm to reveal it catastrophically.
People think wind damage means shingles in the yard. With modern laminates, the real damage happens before you see anything — the bonds break invisibly, and the next storm finishes the job. That's why we push annual inspections so hard for homes near the water. By the time you see the problem, you've already lost the slope.
The DIY Trap: When the "Fix" Makes It Worse
DIY roof repairs aren't just ineffective — they actively redirect damage to new areas. The most dangerous part is that they appear to work, which delays the real fix until the problem has multiplied. Here's a real case from our service area.
The Flex Seal Case — Southern Maryland
Real Service Call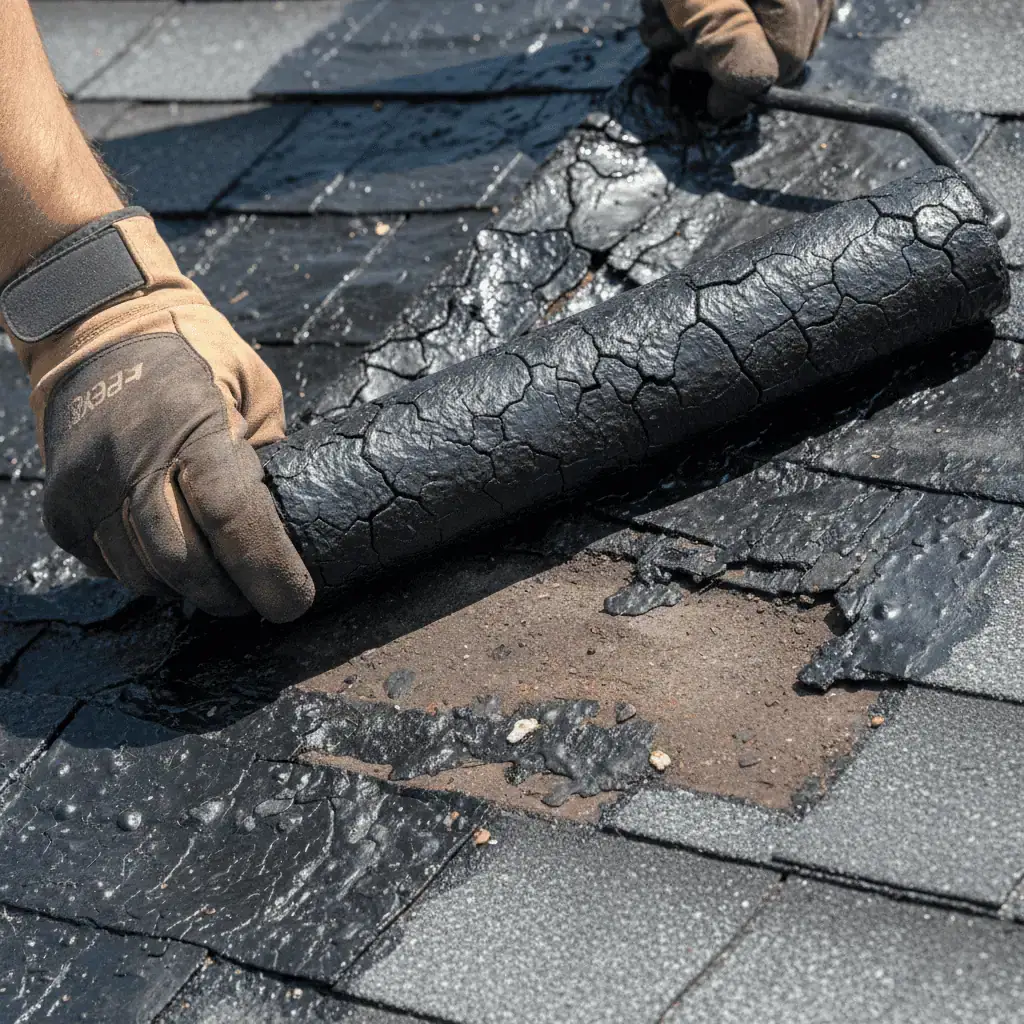 The DIY "Fix"
 The Consequence
Small leak near a flashing transition
The homeowner noticed a ceiling stain after heavy rain. The root cause was likely a minor flashing issue or a broken sealant bond — a standard repair in the $300–$500 range.
Gallon of Flex Seal applied with a paint roller
The homeowner coated the area around the leak with Flex Seal — a thick rubber sealant — using a paint roller. It sealed the visible leak point and the ceiling stain stopped growing. It appeared to work.
UV destroyed the sealant — water found a new path
Flex Seal isn't rated for UV exposure on a roof surface. Within a year, it cracked, peeled, and degraded. The water that used to exit at the original leak point was now diverted sideways toward the gutter line, following a path under the shingle field.
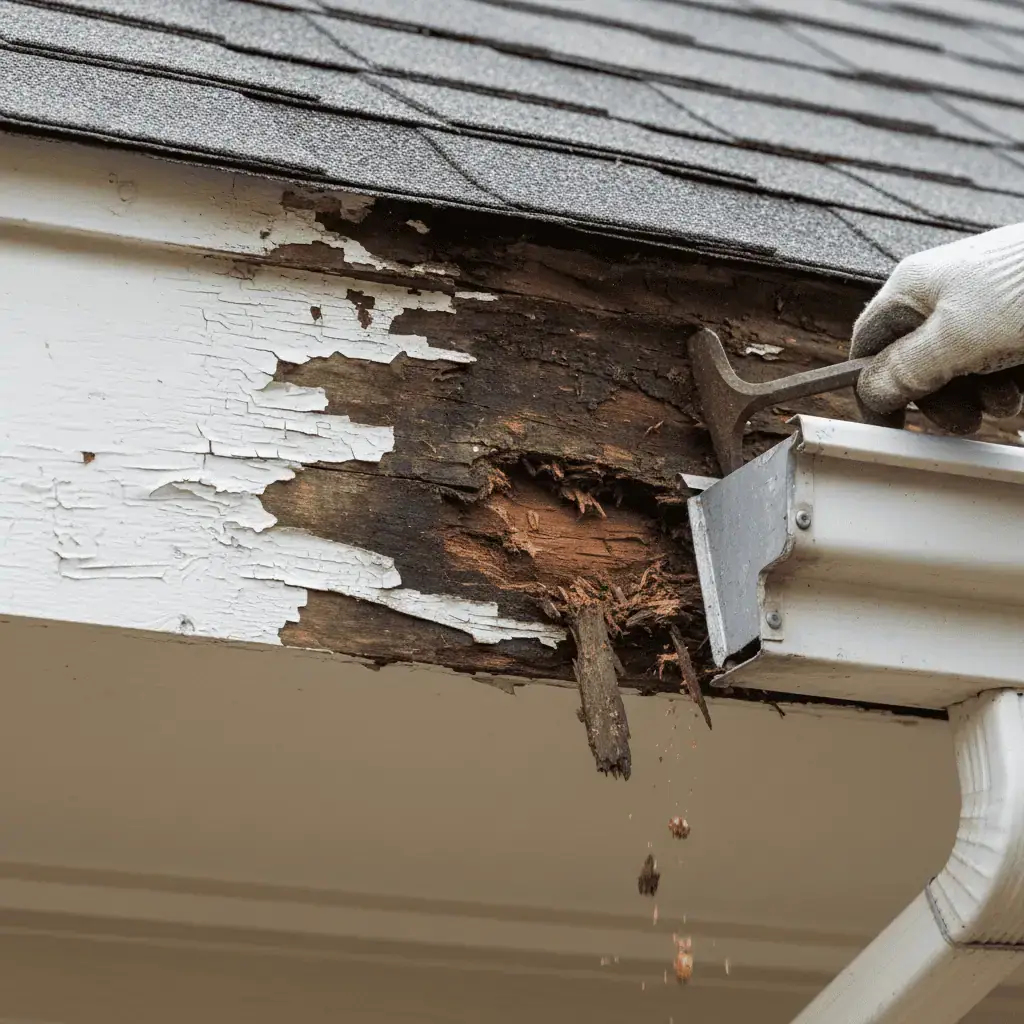
Fascia boards rotted through at the eave
Water had been soaking the fascia at the gutter line for months — completely hidden behind the gutter. The wood was soft, dark, swollen, and crumbling. The gutter was pulling away from the structure because the wood it was attached to had disintegrated.
Full slope replacement + fascia carpentry
The entire slope needed new shingles — the Flex Seal had disrupted the water shedding pattern across the whole surface. The fascia required full carpentry replacement before new gutters could be hung. A problem that started as a $400 repair became a multi-thousand dollar project.
Seal the visible leak point
Caulk, Flex Seal, roof cement, and spray coatings address the spot where water exits — not where it enters. The water doesn't stop. It just finds a new path. And the new path is almost always harder to find, harder to access, and more expensive to fix than the original.
Diagnose and fix the entry point
A forensic inspection traces the water path from the ceiling stain backward to the actual entry point — which may be 10 feet away from where the stain appears. Fix the flashing, reseal the bond, or replace the failed component. The repair addresses why the water got in, not where it came out.
Tried a DIY fix that didn't hold? No judgment — it's one of the most common calls we get. Let us find the real problem before it spreads.
Schedule a Repair EvaluationAnnual Inspections: Catch It Before It Snowballs
Every failure mode on this page — ventilation, installation shortcuts, wind damage, DIY patches — has one thing in common: it could have been caught early with an annual inspection. The math is simple. The hard part is doing it before the damage is visible from the ground.
Preventive Inspection — Southern Maryland
Documenting a minor lifted shingle before it becomes a wind entry point. This is a same-day repair, not a project.
Why Annual Inspections Matter More With Modern Shingles
Older three-tab shingles failed gradually and visibly. You could see missing tabs from the driveway. Modern laminate shingles are different — they're bonded together as a continuous surface, which makes them stronger under normal conditions but means damage is invisible until it's catastrophic.
A broken sealant bond on a laminate roof looks like nothing from the ground. The shingle sits flat, the color is unchanged, and there's no visible gap. But the next storm has a starting point. And because the shingles are bonded together, when one section lifts, it takes an entire run of shingles with it — the unzipping effect we described earlier.
An annual inspection catches that broken bond while it's still a $200 reseal. Skip the inspection, and you're waiting for the storm that turns it into a $5,000+ slope replacement.
What a Real Inspection Covers
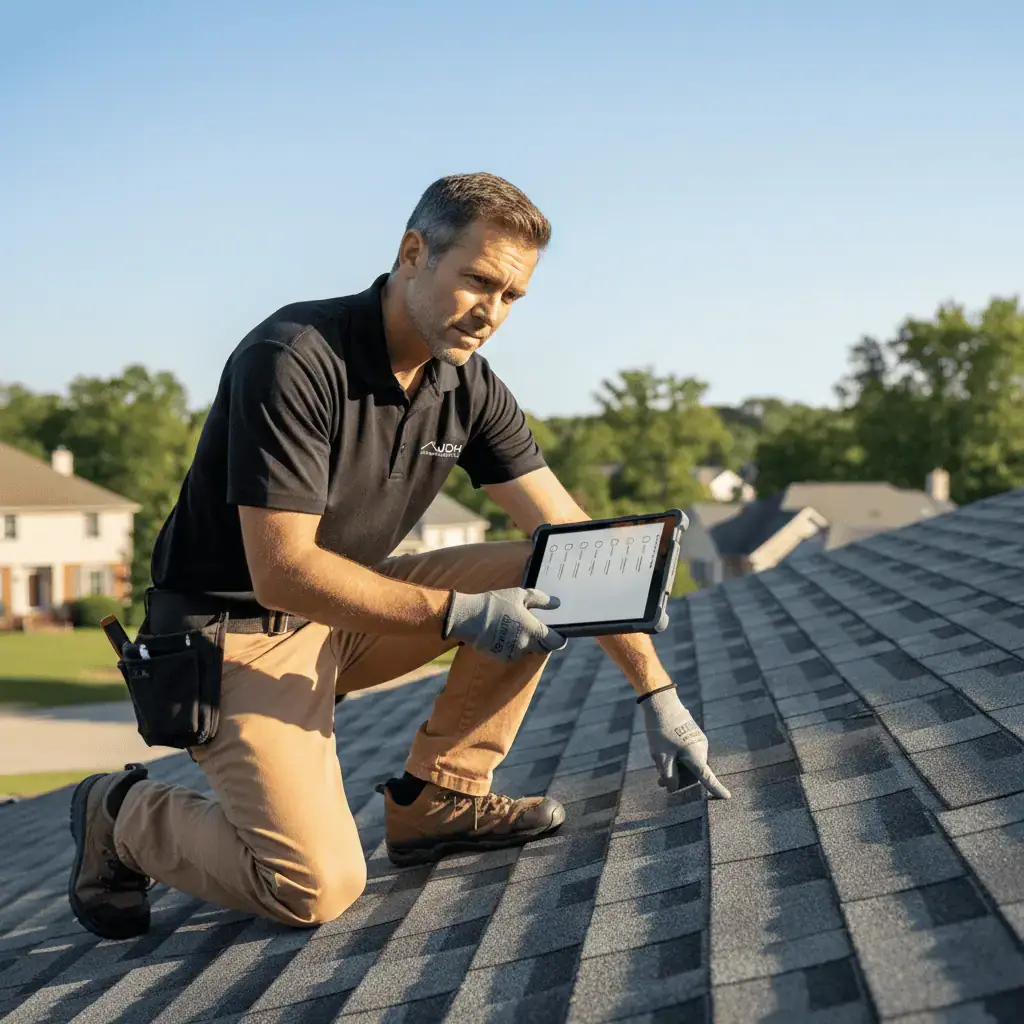
A meaningful annual inspection isn't a 10-minute walk on the roof. It's a systematic evaluation of every component in the system — shingles, sealant bonds, flashing, transitions, pipe boots, ridge cap, ventilation intake and exhaust, soffit condition, fascia, drip edge, and gutter attachment. The inspector should be documenting findings, not just looking. If your inspector doesn't get on the roof with a camera, they're not inspecting — they're estimating.
We recommend scheduling inspections in spring (to assess winter storm damage) or early fall (to prepare for winter). Homes within a few miles of the Chesapeake Bay, Patuxent River, or Potomac should consider twice-annual inspections due to elevated wind exposure.
Catch It Early
- Broken sealant bond resealed — same-day fix
- Cracked pipe boot replaced before it leaks
- Minor flashing gap sealed — no interior damage
- Blocked soffit cleared — ventilation restored
- Typical cost: $150–$500 per issue
Miss It — Wait for Failure
- Broken bond unzips entire slope in next storm
- Cracked pipe boot leaks for months — rots deck sheathing
- Flashing failure causes hidden wall rot and mold
- Years of heat damage from blocked ventilation
- Typical cost: $5,000–$15,000+ per failure
Schedule Your Annual Inspection
Free for homeowners in Southern Maryland and Northern Virginia. We get on the roof, document everything, and give you an honest assessment — no sales pitch required.
How JDH Diagnoses Roof Failures
We don't sell roofs — we diagnose problems. Every inspection starts with understanding the system, not pushing a replacement. If a repair fixes the root cause, that's what we recommend.
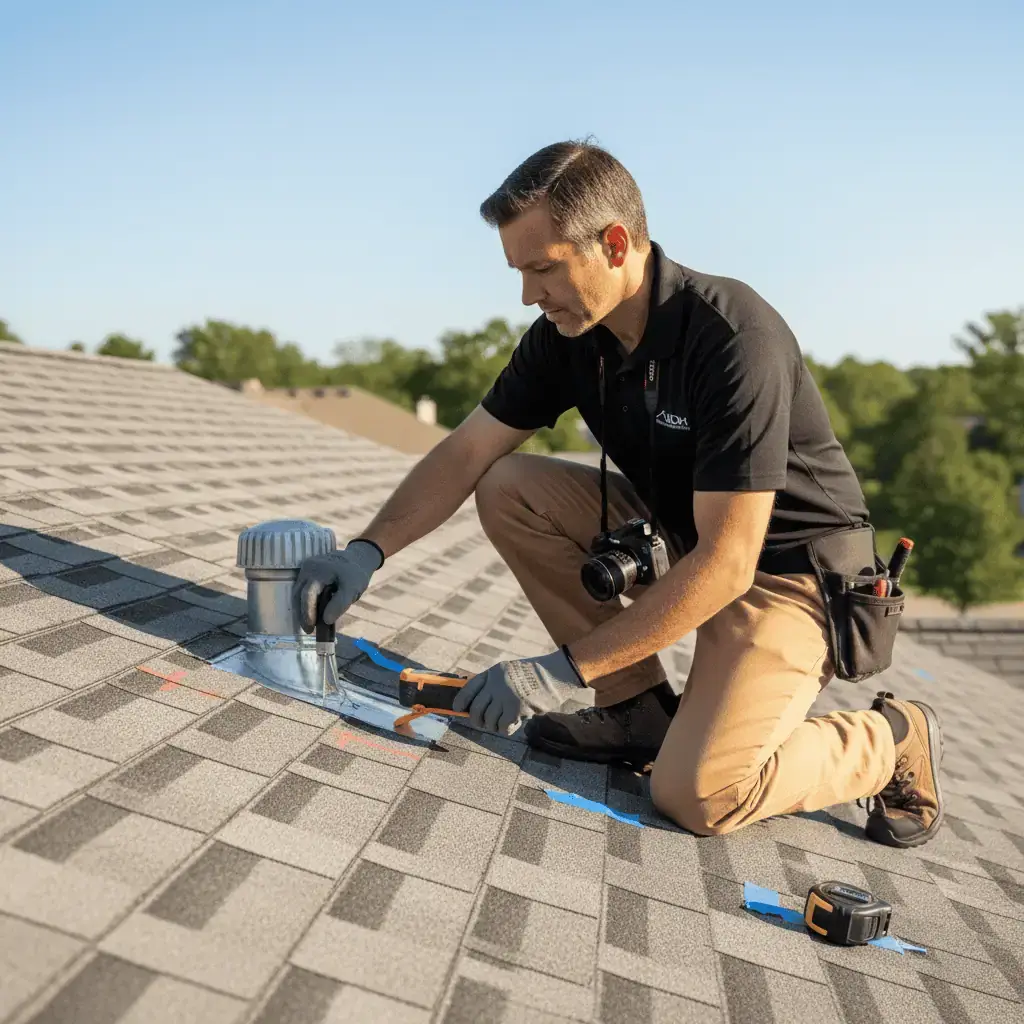
Forensic-Level Evaluation
Multiple tools, documented findings, systematic component-by-component approach.
Full System Evaluation
Every component — shingles, underlayment, flashing, transitions, ventilation, fascia, drip edge — inspected and documented individually.
Ventilation Analysis
Intake and exhaust measured. Blocked soffits identified. Mixed exhaust types flagged. Not just "is there a ridge vent" — is the system actually balanced.
Component-Level Documentation
Photos and notes for every finding. You see exactly what we see — nothing hidden behind vague language or pressure-sell summaries.
Manufacturer Spec Comparison
We compare what was installed against what the manufacturer specifies. If the wrong products were used, we identify exactly where and what needs to change.
Honest Assessment
If a $300 repair solves the problem, we tell you. If the roof needs replacement, we explain exactly why and show you the evidence. No upselling. No fear tactics.
A roof is a system, not a shingle. Our job is to diagnose the system — find where it broke, figure out why, and give the homeowner a clear path to fix the root cause. If we can save a roof with a repair, we'd rather do that than sell a replacement. That's how you build trust that lasts 40 years.
Schedule a Free Inspection
We get on the roof, document every component, and give you a clear diagnosis — no obligation, no pressure.
Book InspectionCall Us Directly
Have a question about something on this page? Want to describe what you're seeing? We're happy to talk it through.
(443) 241-7356